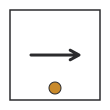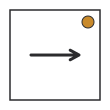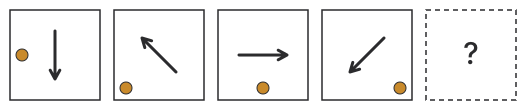
EduFarming
Your list · 0हिं

Type at least two letters. Press Esc to close.

↑↓ navigate↵ openTAB cycle filter

Non-Verbal Reasoning for CUET General Aptitude

About 10 min to learn · 65 questions

Non-verbal questions give a picture instead of words. They look as if they test a knack for seeing things, but every type has a method that works on paper: a flip, a reflection across a fold line, a rule applied once more, or a count done size by size. This lesson covers mirror and water images, paper folding and punching, figure series, and counting triangles, squares and rectangles, with worked examples, diagrams and the traps the wrong options are built from.

Syllabus area
Logical and Analytical Reasoning
On this page · 9 sections
  1. 01The core idea
  2. 02Reflections
  3. 03Paper folding
  4. 04Figure series
  5. 05Counting figures
  6. 06Exam shortcuts
  7. 07Common mistakes
  8. 08Quick revision
  9. 09Check your understanding

The core idea

Every non-verbal question has a rule you can apply on paper instead of a knack you must have. A mirror swaps left and right; water swaps top and bottom; unfolding reflects every hole across the fold; a series changes each element by its own simple rule; and a count goes size by size.

Use the fast elimination checks first: the direction of the flip, the number of holes, the number of sides. One check usually leaves one or two options, and a second check on a single distinctive square, hole or dot settles it.

Reflections

What is a mirror image, and how do you find one quickly?

A mirror image is the figure flipped across the mirror line. For a mirror standing beside the figure, left and right swap and top and bottom stay. On a grid, a shaded square keeps its row and changes its column: in 5 columns, column cc becomes 6−c6 - c.

Mirror and water on a grid

Mirror: new column=(columns+1)−old columnWater: new row=(rows+1)−old row\text{Mirror: new column} = (\text{columns} + 1) - \text{old column} \qquad \text{Water: new row} = (\text{rows} + 1) - \text{old row}

Example 1 · A mirror image

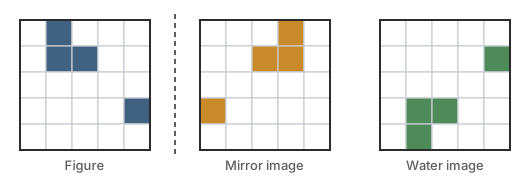
In a 5 × 5 grid the squares at (row, column) (1, 2), (2, 2), (2, 3) and (4, 5) are shaded. A mirror stands to the right. Which squares are shaded in the image?

  1. Every row stays the same.

  2. Every column cc becomes 6−c6 - c: 2 becomes 4, 3 stays 3, 5 becomes 1.

Answer

(1, 4), (2, 4), (2, 3) and (4, 1)

What is a water image, and how is it different from a mirror image?

A water image is the reflection in flat water below the figure: top and bottom swap, and left and right stay. On a 5-row grid, row rr becomes 6−r6 - r.

Example 2 · A water image

The same squares, (1, 2), (2, 2), (2, 3) and (4, 5), are reflected in water below the grid. Which squares are shaded?

  1. Every column stays the same.

  2. Every row rr becomes 6−r6 - r: 1 becomes 5, 2 becomes 4, 4 becomes 2.

Answer

(5, 2), (4, 2), (4, 3) and (2, 5)

Three 5 by 5 grids. The figure has squares shaded at row 1 column 2, row 2 columns 2 and 3, and row 4 column 5. The mirror image flips them left to right, and the water image flips them top to bottom.
Examples 1 and 2. The mirror keeps every row; the water keeps every column.

Watch out

Wrong options use the other reflection, the figure turned upside down, which is both flips at once, or a quarter turn. A reflection never rotates, so an option lying on its side is always wrong. And it makes no difference whether the mirror is on the left or the right.

Exam shortcut

Clocks and letters follow the same rule. In a mirror, 3:00 looks like 9:00. A, H, I, M, O, T, U, V, W, X and Y look the same in a vertical mirror, so a word made only of them just reverses its order.

Paper folding

How do you solve paper folding and punching questions?

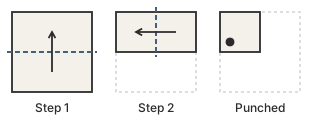
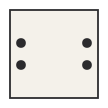
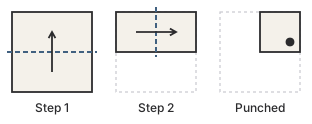
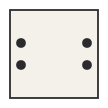
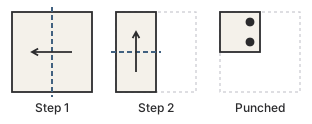
Work backwards. Open the folds in reverse order, and each time you open one, add the mirror image of every hole across that fold line. On a 4 × 4 sheet, a vertical middle fold swaps columns 1 and 4, 2 and 3; a horizontal middle fold swaps rows 1 and 4, 2 and 3.

Example 3 · Two folds, one punch

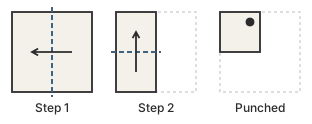
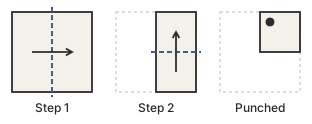
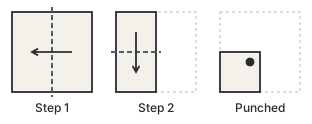
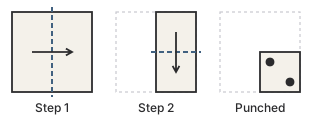
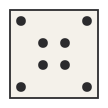
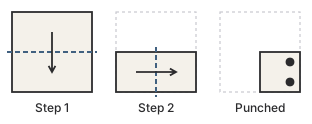
A square sheet is folded right half over left, then bottom half up over the top, leaving the top-left quarter. A hole is punched at (1, 2). Where are the holes when it is opened?

  1. Open the second fold, the horizontal one: (1, 2) gains its reflection (4, 2).

  2. Open the first fold, the vertical one: (1, 2) gains (1, 3), and (4, 2) gains (4, 3).

Answer

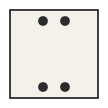
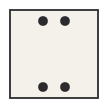
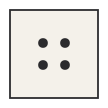
(1, 2), (1, 3), (4, 2) and (4, 3)

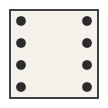
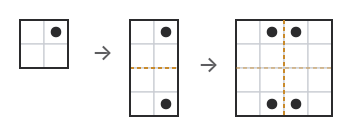
Four holes, symmetric about both centre lines.

Three stages: the folded quarter with one hole; the sheet opened to its left half with holes at rows 1 and 4 of column 2; the full sheet with four holes at rows 1 and 4, columns 2 and 3.
Unfold in reverse order, reflecting every hole across each fold line in turn.

How many holes should there be after unfolding?

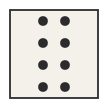
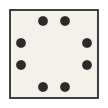
Each fold doubles the layers, so one punch makes 2 holes after one fold, 4 after two and 8 after three. This single count removes many options before you look at positions.

Watch out

Wrong options show too few holes, from opening only one fold; the right number in the wrong places, from reflecting about the wrong line; or only the punched hole, with nothing unfolded.

Figure series

How do you find the next figure in a figure series?

A figure series changes one or more elements from box to box, each by its own simple rule. Follow each element alone: rotation by a fixed angle, movement round the 8 places of the box, the number of sides or parts, or shading.

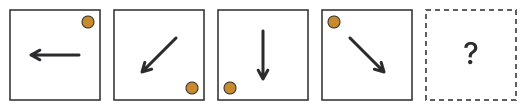
Example 4 · Two rules at once

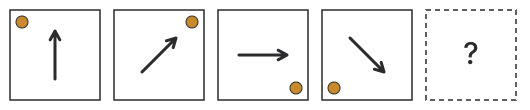
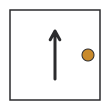
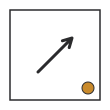
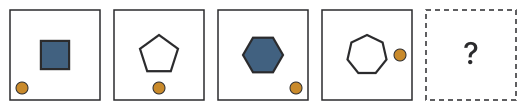
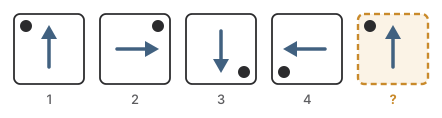
Four boxes show an arrow pointing up, right, down, left, and a dot at the top-left, top-right, bottom-right and bottom-left corners. What comes next?

  1. The arrow turns 90° clockwise each time, so it points up next.

  2. The dot moves 2 of the 8 places clockwise each time, from the bottom-left corner to the top-left.

Answer

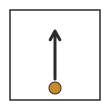
An arrow pointing up, with a dot at the top-left corner

Five boxes. In boxes 1 to 4 the arrow points up, right, down and left, and a dot sits in the top-left, top-right, bottom-right and bottom-left corners. The fifth box, marked with a question mark, shows an arrow pointing up and a dot at the top-left.
Follow the arrow and the dot separately. Each has its own rule.

Exam shortcut

Write down each element's value in each box, find its rule, and apply it once more. Well-made wrong options each break exactly one rule, so an option that fits two rules can still fail the third.

Counting figures

How do you count the triangles in a figure?

Count by size, never by staring: label the smallest pieces, count the triangles of one piece, then two, then three, up to the whole figure, going round every position each time.

FigureTriangles
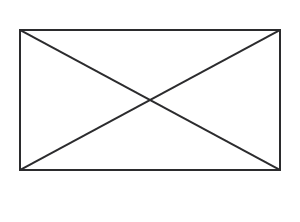
A square or rectangle with both diagonals8
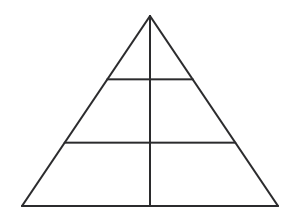
A triangle with its three medians16
A square with both diagonals and both midlines16
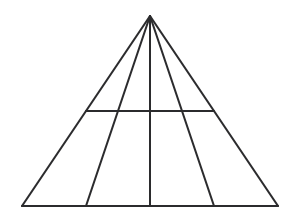
A triangle with nn lines from its top vertex to its base(n+2)(n+1)2\tfrac{(n + 2)(n + 1)}{2}

Example 5 · A fan of lines

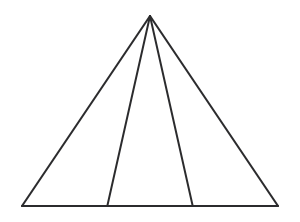
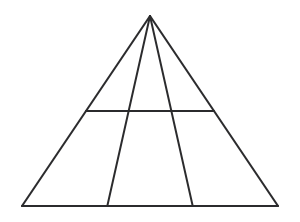
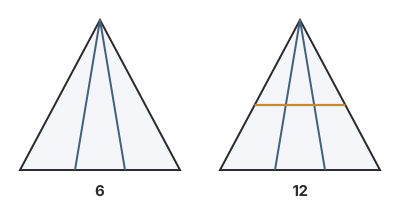
A triangle has 2 lines from its top vertex to its base. How many triangles are there, and how many if a line parallel to the base is added?

  1. There are 4 lines from the vertex, the two sides and 2 inner lines, and any 2 of them make a triangle with the base: 4×32=6\tfrac{4 \times 3}{2} = 6.

  2. A parallel line closes each pair just as the base does, so there are 2 closing lines: 6×2=126 \times 2 = 12.

Answer

6, and 12 with the parallel line

Two triangles, each with two lines from the top vertex to the base. The second also has a line parallel to the base. The first is labelled 6 and the second 12.
Triangles = pairs of lines from the vertex × lines that close them.

Watch out

Counting only the smallest pieces is the commonest slip: in a square with both diagonals, the 4 small triangles are only half the answer.

How do you count squares and rectangles in a grid?

For squares in a grid of rr rows and cc columns, count each size: r×cr \times c of size 1, (r−1)(c−1)(r - 1)(c - 1) of size 2, and so on until a side runs out. For rectangles, choose 2 of the c+1c + 1 vertical lines and 2 of the r+1r + 1 horizontal lines.

Rectangles in a grid

Rectangles=(c+1)c2×(r+1)r2\text{Rectangles} = \frac{(c + 1)c}{2} \times \frac{(r + 1)r}{2}

Example 6 · Rectangles in a grid

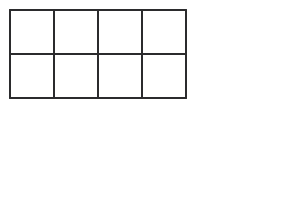
How many rectangles are in a grid of 2 rows and 4 columns?

  1. 5 vertical lines give 5×42=10\tfrac{5 \times 4}{2} = 10 pairs.

  2. 3 horizontal lines give 3×22=3\tfrac{3 \times 2}{2} = 3 pairs.

  3. Rectangles: 10×3=3010 \times 3 = 30.

Answer

30

Exam shortcut

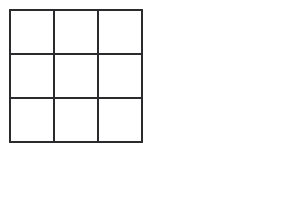
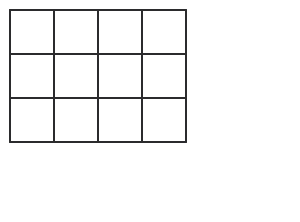
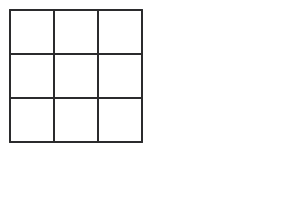
A 3 × 3 grid has 9+4+1=149 + 4 + 1 = 14 squares, and a 4 × 4 grid 16+9+4+1=3016 + 9 + 4 + 1 = 30. Whenever a figure is built from families of lines, count the ways to pick the lines that bound a shape.

Exam shortcuts

  • Flip direction. Mirror: left and right swap. Water: top and bottom swap.
  • Count the holes. 2folds2^{\text{folds}} per punch.
  • One element at a time in a series.
  • Known families for triangles: 8, 16, 16, and the fan formula.
  • Lines, not boxes, for rectangles.

Common mistakes

  • Choosing a rotation instead of a reflection.
  • Swapping the mirror and water rules.
  • Opening folds in the order they were made.
  • Forgetting that every fold doubles the holes.
  • Following only one element in a series.
  • Counting only the smallest pieces.
  • Counting squares when rectangles are asked, or the reverse.

Quick revision

Reflections

  • Mirror: column c→(n+1)−cc \to (n + 1) - c
  • Water: row r→(n+1)−rr \to (n + 1) - r
  • Never a rotation

Folding and series

  • Unfold in reverse, reflect every hole
  • Holes = 2folds2^{\text{folds}} per punch
  • Series: one rule per element

Counting

  • Triangles by size; fan: pairs of lines × closing lines
  • Squares: rc+(r−1)(c−1)+⋯rc + (r - 1)(c - 1) + \cdots
  • Rectangles: pairs of lines each way

Patterns continue in number and letter series, and counting choices of lines in counting and probability.

Next · 08Quick revision

Check your understanding

65 questions, grouped by type, easy to hard. Pick an answer and check it. The worked solution opens when you ask for it.

Mirror and water imagesQ1 of 65Q1

Mirror and water images

16 questions

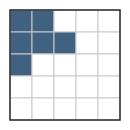
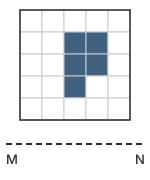
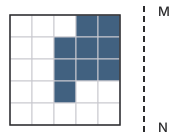
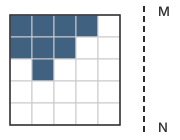
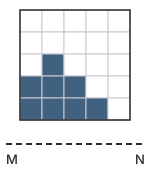
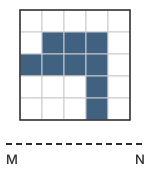
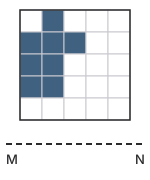
The grid below has 5 shaded squares, and a mirror stands along the dashed line MN on its right. Which figure is the mirror image of the grid?
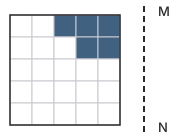
A 5 by 5 grid with 5 shaded squares, at (row, column) counted from the top-left: (1, 3), (1, 4), (1, 5), (2, 4), (2, 5). A vertical mirror line MN is drawn just to the right of the grid.
Options for question 1

Show the explanationHide the explanation

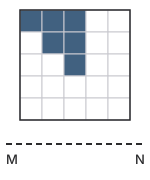
AnswerA · Figure 1A 5 by 5 grid with 5 shaded squares, at (row, column) counted from the top-left: (1, 1), (1, 2), (1, 3), (2, 1), (2, 2).
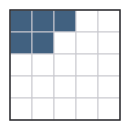
  1. A mirror standing along MN, to the right of the grid, swaps left and right but not top and bottom: a square in column c moves to column 6−c6 - c and stays in its row.

  2. So the shaded squares (1, 3), (1, 4), (1, 5), (2, 4), (2, 5) (row, column) move to (1, 1), (1, 2), (1, 3), (2, 1), (2, 2).

  3. Figure 1 shows exactly these squares.

Worth noting

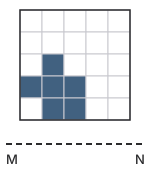
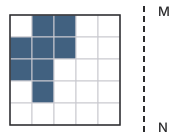
Figure 2 is the water image (top and bottom swapped), Figure 3 is the grid turned upside down, and Figure 4 is the grid given a quarter turn. A mirror never turns a figure; it only flips it.
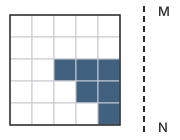

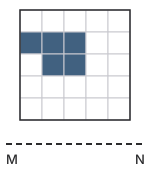
Aditi holds this 6-square pattern up to a mirror placed along the line MN to its right. Which figure does she see in the mirror?

A 5 by 5 grid with 6 shaded squares, at (row, column) counted from the top-left: (3, 3), (3, 4), (3, 5), (4, 4), (4, 5), (5, 5). A vertical mirror line MN is drawn just to the right of the grid.
Options for question 2

Show the explanationHide the explanation

AnswerB · Figure 2A 5 by 5 grid with 6 shaded squares, at (row, column) counted from the top-left: (3, 1), (3, 2), (3, 3), (4, 1), (4, 2), (5, 1).

  1. A mirror standing along MN, to the right of the grid, swaps left and right but not top and bottom: a square in column c moves to column 6−c6 - c and stays in its row.

  2. So the shaded squares (3, 3), (3, 4), (3, 5), (4, 4), (4, 5), (5, 5) (row, column) move to (3, 1), (3, 2), (3, 3), (4, 1), (4, 2), (5, 1).

  3. Figure 2 shows exactly these squares.

Worth noting

Figure 1 is the water image (top and bottom swapped), Figure 3 is the grid turned upside down, and Figure 4 is the grid given a quarter turn. A mirror never turns a figure; it only flips it.
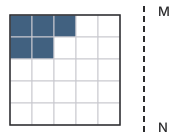
A plane mirror is placed along MN, on the right of the grid of 5 shaded squares. Choose the figure that shows its reflection.

A 5 by 5 grid with 5 shaded squares, at (row, column) counted from the top-left: (1, 1), (1, 2), (1, 3), (2, 1), (2, 2). A vertical mirror line MN is drawn just to the right of the grid.
Options for question 3

Show the explanationHide the explanation

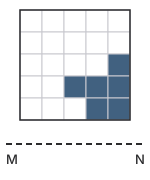
AnswerC · Figure 3A 5 by 5 grid with 5 shaded squares, at (row, column) counted from the top-left: (1, 3), (1, 4), (1, 5), (2, 4), (2, 5).

  1. A mirror standing along MN, to the right of the grid, swaps left and right but not top and bottom: a square in column c moves to column 6−c6 - c and stays in its row.

  2. So the shaded squares (1, 1), (1, 2), (1, 3), (2, 1), (2, 2) (row, column) move to (1, 3), (1, 4), (1, 5), (2, 4), (2, 5).

  3. Figure 3 shows exactly these squares.

Worth noting

Figure 1 is the water image (top and bottom swapped), Figure 2 is the grid turned upside down, and Figure 4 is the grid given a quarter turn. A mirror never turns a figure; it only flips it.
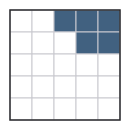
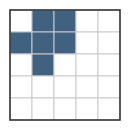
Which of the figures is the correct mirror image of the shaded pattern of 6 squares, if the mirror lies along MN beside it on the right?

A 5 by 5 grid with 6 shaded squares, at (row, column) counted from the top-left: (1, 4), (1, 5), (2, 3), (2, 4), (3, 3), (3, 4). A vertical mirror line MN is drawn just to the right of the grid.
Options for question 4

Show the explanationHide the explanation

AnswerD · Figure 4A 5 by 5 grid with 6 shaded squares, at (row, column) counted from the top-left: (1, 1), (1, 2), (2, 2), (2, 3), (3, 2), (3, 3).

  1. A mirror standing along MN, to the right of the grid, swaps left and right but not top and bottom: a square in column c moves to column 6−c6 - c and stays in its row.

  2. So the shaded squares (1, 4), (1, 5), (2, 3), (2, 4), (3, 3), (3, 4) (row, column) move to (1, 1), (1, 2), (2, 2), (2, 3), (3, 2), (3, 3).

  3. Figure 4 shows exactly these squares.

Worth noting

Figure 1 is the water image (top and bottom swapped), Figure 2 is the grid turned upside down, and Figure 3 is the grid given a quarter turn. A mirror never turns a figure; it only flips it.

Tenzin reflects the 6 shaded squares of this grid in a vertical mirror along MN. Which figure shows the reflection he sees?

A 5 by 5 grid with 6 shaded squares, at (row, column) counted from the top-left: (1, 4), (1, 5), (2, 3), (2, 4), (2, 5), (3, 5). A vertical mirror line MN is drawn just to the right of the grid.
Options for question 5

Show the explanationHide the explanation

AnswerB · Figure 2A 5 by 5 grid with 6 shaded squares, at (row, column) counted from the top-left: (1, 1), (1, 2), (2, 1), (2, 2), (2, 3), (3, 1).

  1. A mirror standing along MN, to the right of the grid, swaps left and right but not top and bottom: a square in column c moves to column 6−c6 - c and stays in its row.

  2. So the shaded squares (1, 4), (1, 5), (2, 3), (2, 4), (2, 5), (3, 5) (row, column) move to (1, 1), (1, 2), (2, 1), (2, 2), (2, 3), (3, 1).

  3. Figure 2 shows exactly these squares.

Worth noting

Figure 1 is the water image (top and bottom swapped), Figure 3 is the grid turned upside down, and Figure 4 is the grid given a quarter turn. A mirror never turns a figure; it only flips it.
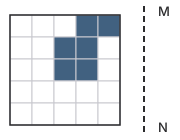
The grid below has 5 shaded squares and stands on the edge of still water along the line MN. Which figure is its water image?

A 5 by 5 grid with 5 shaded squares, at (row, column) counted from the top-left: (2, 1), (2, 2), (2, 3), (3, 2), (3, 3). A horizontal water line MN is drawn just below the grid.
Options for question 6

Show the explanationHide the explanation

AnswerD · Figure 4A 5 by 5 grid with 5 shaded squares, at (row, column) counted from the top-left: (3, 2), (3, 3), (4, 1), (4, 2), (4, 3).

  1. Water along MN, below the grid, swaps top and bottom but not left and right: a square in row r moves to row 6−r6 - r and stays in its column.

  2. So the shaded squares (2, 1), (2, 2), (2, 3), (3, 2), (3, 3) (row, column) move to (3, 2), (3, 3), (4, 1), (4, 2), (4, 3).

  3. Figure 4 shows exactly these squares.

Worth noting

Figure 1 is the mirror image (left and right swapped), Figure 2 is the grid turned upside down, and Figure 3 is the grid given a quarter turn. A water image flips top to bottom and nothing else.

Which figure shows the reflection in water of this pattern of 6 shaded squares, with the water surface along MN below it?

A 5 by 5 grid with 6 shaded squares, at (row, column) counted from the top-left: (3, 2), (4, 1), (4, 2), (4, 3), (5, 2), (5, 3). A horizontal water line MN is drawn just below the grid.
Options for question 7

Show the explanationHide the explanation

AnswerC · Figure 3A 5 by 5 grid with 6 shaded squares, at (row, column) counted from the top-left: (1, 2), (1, 3), (2, 1), (2, 2), (2, 3), (3, 2).

  1. Water along MN, below the grid, swaps top and bottom but not left and right: a square in row r moves to row 6−r6 - r and stays in its column.

  2. So the shaded squares (3, 2), (4, 1), (4, 2), (4, 3), (5, 2), (5, 3) (row, column) move to (1, 2), (1, 3), (2, 1), (2, 2), (2, 3), (3, 2).

  3. Figure 3 shows exactly these squares.

Worth noting

Figure 1 is the mirror image (left and right swapped), Figure 2 is the grid turned upside down, and Figure 4 is the grid given a quarter turn. A water image flips top to bottom and nothing else.

Joseph sees this grid of 5 shaded squares reflected in a pond whose surface lies along MN. Which figure does he see in the water?

A 5 by 5 grid with 5 shaded squares, at (row, column) counted from the top-left: (2, 3), (2, 4), (3, 3), (3, 4), (4, 3). A horizontal water line MN is drawn just below the grid.
Options for question 8

Show the explanationHide the explanation

AnswerA · Figure 1A 5 by 5 grid with 5 shaded squares, at (row, column) counted from the top-left: (2, 3), (3, 3), (3, 4), (4, 3), (4, 4).

  1. Water along MN, below the grid, swaps top and bottom but not left and right: a square in row r moves to row 6−r6 - r and stays in its column.

  2. So the shaded squares (2, 3), (2, 4), (3, 3), (3, 4), (4, 3) (row, column) move to (2, 3), (3, 3), (3, 4), (4, 3), (4, 4).

  3. Figure 1 shows exactly these squares.

Worth noting

Figure 2 is the mirror image (left and right swapped), Figure 3 is the grid turned upside down, and Figure 4 is the grid given a quarter turn. A water image flips top to bottom and nothing else.

Choose the water image of the 6-square pattern, the water line being the dashed line MN at its foot.

A 5 by 5 grid with 6 shaded squares, at (row, column) counted from the top-left: (1, 1), (1, 2), (1, 3), (2, 2), (2, 3), (3, 3). A horizontal water line MN is drawn just below the grid.
Options for question 9

Show the explanationHide the explanation

AnswerB · Figure 2A 5 by 5 grid with 6 shaded squares, at (row, column) counted from the top-left: (3, 3), (4, 2), (4, 3), (5, 1), (5, 2), (5, 3).

  1. Water along MN, below the grid, swaps top and bottom but not left and right: a square in row r moves to row 6−r6 - r and stays in its column.

  2. So the shaded squares (1, 1), (1, 2), (1, 3), (2, 2), (2, 3), (3, 3) (row, column) move to (3, 3), (4, 2), (4, 3), (5, 1), (5, 2), (5, 3).

  3. Figure 2 shows exactly these squares.

Worth noting

Figure 1 is the mirror image (left and right swapped), Figure 3 is the grid turned upside down, and Figure 4 is the grid given a quarter turn. A water image flips top to bottom and nothing else.

A pattern of 6 shaded squares is reflected in a still lake whose surface runs along MN. Which figure is the reflection?

A 5 by 5 grid with 6 shaded squares, at (row, column) counted from the top-left: (3, 5), (4, 3), (4, 4), (4, 5), (5, 4), (5, 5). A horizontal water line MN is drawn just below the grid.
Options for question 10

Show the explanationHide the explanation

AnswerC · Figure 3A 5 by 5 grid with 6 shaded squares, at (row, column) counted from the top-left: (1, 4), (1, 5), (2, 3), (2, 4), (2, 5), (3, 5).

  1. Water along MN, below the grid, swaps top and bottom but not left and right: a square in row r moves to row 6−r6 - r and stays in its column.

  2. So the shaded squares (3, 5), (4, 3), (4, 4), (4, 5), (5, 4), (5, 5) (row, column) move to (1, 4), (1, 5), (2, 3), (2, 4), (2, 5), (3, 5).

  3. Figure 3 shows exactly these squares.

Worth noting

Figure 1 is the mirror image (left and right swapped), Figure 2 is the grid turned upside down, and Figure 4 is the grid given a quarter turn. A water image flips top to bottom and nothing else.

Find the mirror image of the grid, with its 8 shaded squares, when the mirror is held vertically along the line MN to its right.

A 5 by 5 grid with 8 shaded squares, at (row, column) counted from the top-left: (1, 2), (1, 3), (2, 1), (2, 2), (2, 3), (3, 1), (3, 2), (4, 2). A vertical mirror line MN is drawn just to the right of the grid.
Options for question 11

Show the explanationHide the explanation

AnswerA · Figure 1A 5 by 5 grid with 8 shaded squares, at (row, column) counted from the top-left: (1, 3), (1, 4), (2, 3), (2, 4), (2, 5), (3, 4), (3, 5), (4, 4).

  1. A mirror standing along MN, to the right of the grid, swaps left and right but not top and bottom: a square in column c moves to column 6−c6 - c and stays in its row.

  2. So the shaded squares (1, 2), (1, 3), (2, 1), (2, 2), (2, 3), (3, 1), (3, 2), (4, 2) (row, column) move to (1, 3), (1, 4), (2, 3), (2, 4), (2, 5), (3, 4), (3, 5), (4, 4).

  3. Figure 1 shows exactly these squares.

Worth noting

Figure 2 is the water image (top and bottom swapped), Figure 3 is the grid turned upside down, and Figure 4 is the grid given a quarter turn. A mirror never turns a figure; it only flips it.

The pattern of 9 shaded squares below faces a mirror along the dashed line MN on its right side. Which figure appears in that mirror?

A 5 by 5 grid with 9 shaded squares, at (row, column) counted from the top-left: (1, 4), (1, 5), (2, 3), (2, 4), (2, 5), (3, 3), (3, 4), (3, 5), (4, 3). A vertical mirror line MN is drawn just to the right of the grid.
Options for question 12

Show the explanationHide the explanation

AnswerD · Figure 4A 5 by 5 grid with 9 shaded squares, at (row, column) counted from the top-left: (1, 1), (1, 2), (2, 1), (2, 2), (2, 3), (3, 1), (3, 2), (3, 3), (4, 3).

  1. A mirror standing along MN, to the right of the grid, swaps left and right but not top and bottom: a square in column c moves to column 6−c6 - c and stays in its row.

  2. So the shaded squares (1, 4), (1, 5), (2, 3), (2, 4), (2, 5), (3, 3), (3, 4), (3, 5), (4, 3) (row, column) move to (1, 1), (1, 2), (2, 1), (2, 2), (2, 3), (3, 1), (3, 2), (3, 3), (4, 3).

  3. Figure 4 shows exactly these squares.

Worth noting

Figure 1 is the water image (top and bottom swapped), Figure 2 is the grid turned upside down, and Figure 3 is the grid given a quarter turn. A mirror never turns a figure; it only flips it.

A mirror is set up along MN, just right of this grid in which 8 squares are shaded. Which figure is the image in the mirror?

A 5 by 5 grid with 8 shaded squares, at (row, column) counted from the top-left: (1, 1), (1, 2), (1, 3), (1, 4), (2, 1), (2, 2), (2, 3), (3, 2). A vertical mirror line MN is drawn just to the right of the grid.
Options for question 13

Show the explanationHide the explanation

AnswerC · Figure 3A 5 by 5 grid with 8 shaded squares, at (row, column) counted from the top-left: (1, 2), (1, 3), (1, 4), (1, 5), (2, 3), (2, 4), (2, 5), (3, 4).

  1. A mirror standing along MN, to the right of the grid, swaps left and right but not top and bottom: a square in column c moves to column 6−c6 - c and stays in its row.

  2. So the shaded squares (1, 1), (1, 2), (1, 3), (1, 4), (2, 1), (2, 2), (2, 3), (3, 2) (row, column) move to (1, 2), (1, 3), (1, 4), (1, 5), (2, 3), (2, 4), (2, 5), (3, 4).

  3. Figure 3 shows exactly these squares.

Worth noting

Figure 1 is the water image (top and bottom swapped), Figure 2 is the grid turned upside down, and Figure 4 is the grid given a quarter turn. A mirror never turns a figure; it only flips it.
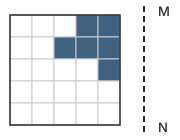
If the line MN under this grid is the surface of water, which figure is the grid's water image? The grid has 8 shaded squares.

A 5 by 5 grid with 8 shaded squares, at (row, column) counted from the top-left: (3, 2), (4, 1), (4, 2), (4, 3), (5, 1), (5, 2), (5, 3), (5, 4). A horizontal water line MN is drawn just below the grid.
Options for question 14

Show the explanationHide the explanation

AnswerD · Figure 4A 5 by 5 grid with 8 shaded squares, at (row, column) counted from the top-left: (1, 1), (1, 2), (1, 3), (1, 4), (2, 1), (2, 2), (2, 3), (3, 2).

  1. Water along MN, below the grid, swaps top and bottom but not left and right: a square in row r moves to row 6−r6 - r and stays in its column.

  2. So the shaded squares (3, 2), (4, 1), (4, 2), (4, 3), (5, 1), (5, 2), (5, 3), (5, 4) (row, column) move to (1, 1), (1, 2), (1, 3), (1, 4), (2, 1), (2, 2), (2, 3), (3, 2).

  3. Figure 4 shows exactly these squares.

Worth noting

Figure 1 is the mirror image (left and right swapped), Figure 2 is the grid turned upside down, and Figure 3 is the grid given a quarter turn. A water image flips top to bottom and nothing else.

The 9 shaded squares of this grid are reflected in water lying along MN below the grid. Pick the figure that shows the reflection.

A 5 by 5 grid with 9 shaded squares, at (row, column) counted from the top-left: (2, 2), (2, 3), (2, 4), (3, 1), (3, 2), (3, 3), (3, 4), (4, 4), (5, 4). A horizontal water line MN is drawn just below the grid.
Options for question 15

Show the explanationHide the explanation

AnswerA · Figure 1A 5 by 5 grid with 9 shaded squares, at (row, column) counted from the top-left: (1, 4), (2, 4), (3, 1), (3, 2), (3, 3), (3, 4), (4, 2), (4, 3), (4, 4).

  1. Water along MN, below the grid, swaps top and bottom but not left and right: a square in row r moves to row 6−r6 - r and stays in its column.

  2. So the shaded squares (2, 2), (2, 3), (2, 4), (3, 1), (3, 2), (3, 3), (3, 4), (4, 4), (5, 4) (row, column) move to (1, 4), (2, 4), (3, 1), (3, 2), (3, 3), (3, 4), (4, 2), (4, 3), (4, 4).

  3. Figure 1 shows exactly these squares.

Worth noting

Figure 2 is the mirror image (left and right swapped), Figure 3 is the grid turned upside down, and Figure 4 is the grid given a quarter turn. A water image flips top to bottom and nothing else.

Fatima places this grid, with 8 squares shaded, at the edge of a water tank along MN. Which figure is its image in the water?

A 5 by 5 grid with 8 shaded squares, at (row, column) counted from the top-left: (1, 2), (2, 1), (2, 2), (2, 3), (3, 1), (3, 2), (4, 1), (4, 2). A horizontal water line MN is drawn just below the grid.
Options for question 16

Show the explanationHide the explanation

AnswerB · Figure 2A 5 by 5 grid with 8 shaded squares, at (row, column) counted from the top-left: (2, 1), (2, 2), (3, 1), (3, 2), (4, 1), (4, 2), (4, 3), (5, 2).

  1. Water along MN, below the grid, swaps top and bottom but not left and right: a square in row r moves to row 6−r6 - r and stays in its column.

  2. So the shaded squares (1, 2), (2, 1), (2, 2), (2, 3), (3, 1), (3, 2), (4, 1), (4, 2) (row, column) move to (2, 1), (2, 2), (3, 1), (3, 2), (4, 1), (4, 2), (4, 3), (5, 2).

  3. Figure 2 shows exactly these squares.

Worth noting

Figure 1 is the mirror image (left and right swapped), Figure 3 is the grid turned upside down, and Figure 4 is the grid given a quarter turn. A water image flips top to bottom and nothing else.

Paper folding and punching

16 questions

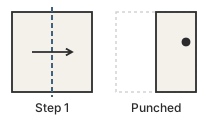
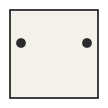
A square sheet is folded once, as shown, and a single hole is punched through it. Which figure shows the sheet opened out?

A square sheet, thought of as a 4 by 4 grid: the left half is folded over onto the right half. One hole is then punched through the folded sheet, in the square at (row, column) (2, 4) of the original sheet.
Options for question 17

Show the explanationHide the explanation

AnswerA · Figure 1An unfolded square sheet, marked as a 4 by 4 grid, with 2 holes at (row, column) from the top-left: (2, 1), (2, 4).

  1. Open the folds in reverse order. Opening a fold adds the mirror image of every hole across that fold line, because each hole went through both layers.

  2. Opening step 1 (the vertical fold) gives holes at (2, 1), (2, 4) (row, column).

  3. Figure 1 shows these 2 holes.

Worth noting

The folded sheet has 2 layers, so each punch makes 2 holes. A figure with fewer holes has left a fold closed; one with the right number in the wrong places has opened a fold about the wrong line.

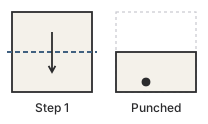
Meera folds a square of paper in half along the dashed line and punches one hole where the figure marks it. How does the paper look when she unfolds it?
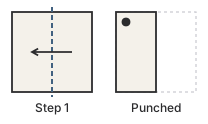
A square sheet, thought of as a 4 by 4 grid: the top half is folded down onto the bottom half. One hole is then punched through the folded sheet, in the square at (row, column) (4, 2) of the original sheet.
Options for question 18

Show the explanationHide the explanation

AnswerB · Figure 2An unfolded square sheet, marked as a 4 by 4 grid, with 2 holes at (row, column) from the top-left: (1, 2), (4, 2).

  1. Open the folds in reverse order. Opening a fold adds the mirror image of every hole across that fold line, because each hole went through both layers.

  2. Opening step 1 (the horizontal fold) gives holes at (1, 2), (4, 2) (row, column).

  3. Figure 2 shows these 2 holes.

Worth noting

The folded sheet has 2 layers, so each punch makes 2 holes. A figure with fewer holes has left a fold closed; one with the right number in the wrong places has opened a fold about the wrong line.

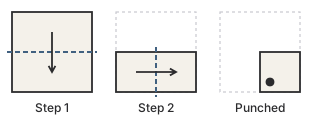
After one fold and one punch, shown step by step in the figure, the paper is spread flat again. Pick the figure that matches it.
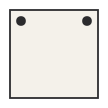
A square sheet, thought of as a 4 by 4 grid: the right half is folded over onto the left half. One hole is then punched through the folded sheet, in the square at (row, column) (1, 1) of the original sheet.
Options for question 19

Show the explanationHide the explanation

AnswerC · Figure 3An unfolded square sheet, marked as a 4 by 4 grid, with 2 holes at (row, column) from the top-left: (1, 1), (1, 4).

  1. Open the folds in reverse order. Opening a fold adds the mirror image of every hole across that fold line, because each hole went through both layers.

  2. Opening step 1 (the vertical fold) gives holes at (1, 1), (1, 4) (row, column).

  3. Figure 3 shows these 2 holes.

Worth noting

The folded sheet has 2 layers, so each punch makes 2 holes. A figure with fewer holes has left a fold closed; one with the right number in the wrong places has opened a fold about the wrong line.

Gurpreet halves a square card with a single fold and makes one punch through the double layer. Which picture shows the card when it is opened?

A square sheet, thought of as a 4 by 4 grid: the bottom half is folded up onto the top half. One hole is then punched through the folded sheet, in the square at (row, column) (2, 3) of the original sheet.
Options for question 20

Show the explanationHide the explanation

AnswerD · Figure 4An unfolded square sheet, marked as a 4 by 4 grid, with 2 holes at (row, column) from the top-left: (2, 3), (3, 3).

  1. Open the folds in reverse order. Opening a fold adds the mirror image of every hole across that fold line, because each hole went through both layers.

  2. Opening step 1 (the horizontal fold) gives holes at (2, 3), (3, 3) (row, column).

  3. Figure 4 shows these 2 holes.

Worth noting

The folded sheet has 2 layers, so each punch makes 2 holes. A figure with fewer holes has left a fold closed; one with the right number in the wrong places has opened a fold about the wrong line.

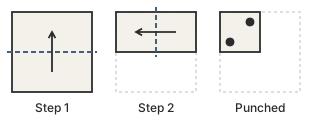
A square sheet is folded twice, following the steps in the figure, and then punched once. Which figure shows it after it is fully unfolded?

A square sheet, thought of as a 4 by 4 grid: the left half is folded over onto the right half, then the top half is folded down onto the bottom half. One hole is then punched through the folded sheet, in the square at (row, column) (3, 4) of the original sheet.
Options for question 21

Show the explanationHide the explanation

AnswerB · Figure 2An unfolded square sheet, marked as a 4 by 4 grid, with 4 holes at (row, column) from the top-left: (2, 1), (2, 4), (3, 1), (3, 4).

  1. Open the folds in reverse order. Opening a fold adds the mirror image of every hole across that fold line, because each hole went through both layers.

  2. Opening step 2 (the horizontal fold) gives holes at (2, 4), (3, 4) (row, column).

  3. Opening step 1 (the vertical fold) gives holes at (2, 1), (2, 4), (3, 1), (3, 4) (row, column).

  4. Figure 2 shows these 4 holes.

Worth noting

The folded sheet has 4 layers, so each punch makes 4 holes. A figure with fewer holes has left a fold closed; one with the right number in the wrong places has opened a fold about the wrong line.

In an art class, Tenzin folds a paper square into quarters as shown and pushes a pencil through it once. What pattern of holes appears when he opens the paper?

A square sheet, thought of as a 4 by 4 grid: the top half is folded down onto the bottom half, then the left half is folded over onto the right half. One hole is then punched through the folded sheet, in the square at (row, column) (4, 3) of the original sheet.
Options for question 22

Show the explanationHide the explanation

AnswerA · Figure 1An unfolded square sheet, marked as a 4 by 4 grid, with 4 holes at (row, column) from the top-left: (1, 2), (1, 3), (4, 2), (4, 3).

  1. Open the folds in reverse order. Opening a fold adds the mirror image of every hole across that fold line, because each hole went through both layers.

  2. Opening step 2 (the vertical fold) gives holes at (4, 2), (4, 3) (row, column).

  3. Opening step 1 (the horizontal fold) gives holes at (1, 2), (1, 3), (4, 2), (4, 3) (row, column).

  4. Figure 1 shows these 4 holes.

Worth noting

The folded sheet has 4 layers, so each punch makes 4 holes. A figure with fewer holes has left a fold closed; one with the right number in the wrong places has opened a fold about the wrong line.

The figure shows two folds made one after the other, then a punch through every layer. Choose the unfolded sheet.

A square sheet, thought of as a 4 by 4 grid: the right half is folded over onto the left half, then the bottom half is folded up onto the top half. One hole is then punched through the folded sheet, in the square at (row, column) (1, 2) of the original sheet.
Options for question 23

Show the explanationHide the explanation

AnswerD · Figure 4An unfolded square sheet, marked as a 4 by 4 grid, with 4 holes at (row, column) from the top-left: (1, 2), (1, 3), (4, 2), (4, 3).

  1. Open the folds in reverse order. Opening a fold adds the mirror image of every hole across that fold line, because each hole went through both layers.

  2. Opening step 2 (the horizontal fold) gives holes at (1, 2), (4, 2) (row, column).

  3. Opening step 1 (the vertical fold) gives holes at (1, 2), (1, 3), (4, 2), (4, 3) (row, column).

  4. Figure 4 shows these 4 holes.

Worth noting

The folded sheet has 4 layers, so each punch makes 4 holes. A figure with fewer holes has left a fold closed; one with the right number in the wrong places has opened a fold about the wrong line.

Fatima doubles over a square napkin twice, exactly as drawn, and snips one small hole in it. Which figure shows the napkin laid out flat?
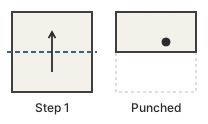
A square sheet, thought of as a 4 by 4 grid: the bottom half is folded up onto the top half, then the right half is folded over onto the left half. One hole is then punched through the folded sheet, in the square at (row, column) (2, 1) of the original sheet.
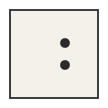
Options for question 24

Show the explanationHide the explanation

AnswerC · Figure 3An unfolded square sheet, marked as a 4 by 4 grid, with 4 holes at (row, column) from the top-left: (2, 1), (2, 4), (3, 1), (3, 4).
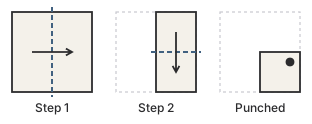
  1. Open the folds in reverse order. Opening a fold adds the mirror image of every hole across that fold line, because each hole went through both layers.

  2. Opening step 2 (the vertical fold) gives holes at (2, 1), (2, 4) (row, column).

  3. Opening step 1 (the horizontal fold) gives holes at (2, 1), (2, 4), (3, 1), (3, 4) (row, column).

  4. Figure 3 shows these 4 holes.

Worth noting

The folded sheet has 4 layers, so each punch makes 4 holes. A figure with fewer holes has left a fold closed; one with the right number in the wrong places has opened a fold about the wrong line.

Two folds reduce a square page to a quarter of its size, and one hole is then punched. When the page is opened out completely, which figure does it resemble?

A square sheet, thought of as a 4 by 4 grid: the left half is folded over onto the right half, then the bottom half is folded up onto the top half. One hole is then punched through the folded sheet, in the square at (row, column) (1, 3) of the original sheet.
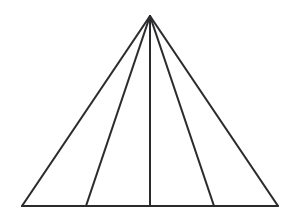
Options for question 25

Show the explanationHide the explanation

AnswerD · Figure 4An unfolded square sheet, marked as a 4 by 4 grid, with 4 holes at (row, column) from the top-left: (1, 2), (1, 3), (4, 2), (4, 3).
  1. Open the folds in reverse order. Opening a fold adds the mirror image of every hole across that fold line, because each hole went through both layers.

  2. Opening step 2 (the horizontal fold) gives holes at (1, 3), (4, 3) (row, column).

  3. Opening step 1 (the vertical fold) gives holes at (1, 2), (1, 3), (4, 2), (4, 3) (row, column).

  4. Figure 4 shows these 4 holes.

Worth noting

The folded sheet has 4 layers, so each punch makes 4 holes. A figure with fewer holes has left a fold closed; one with the right number in the wrong places has opened a fold about the wrong line.

Joseph folds a square handkerchief in half and in half again, as shown, before punching it once. Identify how it looks when unfolded.

A square sheet, thought of as a 4 by 4 grid: the top half is folded down onto the bottom half, then the right half is folded over onto the left half. One hole is then punched through the folded sheet, in the square at (row, column) (4, 1) of the original sheet.
Options for question 26

Show the explanationHide the explanation

AnswerC · Figure 3An unfolded square sheet, marked as a 4 by 4 grid, with 4 holes at (row, column) from the top-left: (1, 1), (1, 4), (4, 1), (4, 4).

  1. Open the folds in reverse order. Opening a fold adds the mirror image of every hole across that fold line, because each hole went through both layers.

  2. Opening step 2 (the vertical fold) gives holes at (4, 1), (4, 4) (row, column).

  3. Opening step 1 (the horizontal fold) gives holes at (1, 1), (1, 4), (4, 1), (4, 4) (row, column).

  4. Figure 3 shows these 4 holes.

Worth noting

The folded sheet has 4 layers, so each punch makes 4 holes. A figure with fewer holes has left a fold closed; one with the right number in the wrong places has opened a fold about the wrong line.

Follow the two folding steps and the punch in the figure. Which of the four figures is the opened sheet?

A square sheet, thought of as a 4 by 4 grid: the right half is folded over onto the left half, then the top half is folded down onto the bottom half. One hole is then punched through the folded sheet, in the square at (row, column) (3, 2) of the original sheet.
Options for question 27

Show the explanationHide the explanation

AnswerA · Figure 1An unfolded square sheet, marked as a 4 by 4 grid, with 4 holes at (row, column) from the top-left: (2, 2), (2, 3), (3, 2), (3, 3).

  1. Open the folds in reverse order. Opening a fold adds the mirror image of every hole across that fold line, because each hole went through both layers.

  2. Opening step 2 (the horizontal fold) gives holes at (2, 2), (3, 2) (row, column).

  3. Opening step 1 (the vertical fold) gives holes at (2, 2), (2, 3), (3, 2), (3, 3) (row, column).

  4. Figure 1 shows these 4 holes.

Worth noting

The folded sheet has 4 layers, so each punch makes 4 holes. A figure with fewer holes has left a fold closed; one with the right number in the wrong places has opened a fold about the wrong line.

A square of tracing paper is creased twice along the dashed lines and then pierced at a single point. Which figure shows every hole once it is unfolded?

A square sheet, thought of as a 4 by 4 grid: the bottom half is folded up onto the top half, then the left half is folded over onto the right half. One hole is then punched through the folded sheet, in the square at (row, column) (2, 4) of the original sheet.
Options for question 28

Show the explanationHide the explanation

AnswerB · Figure 2An unfolded square sheet, marked as a 4 by 4 grid, with 4 holes at (row, column) from the top-left: (2, 1), (2, 4), (3, 1), (3, 4).

  1. Open the folds in reverse order. Opening a fold adds the mirror image of every hole across that fold line, because each hole went through both layers.

  2. Opening step 2 (the vertical fold) gives holes at (2, 1), (2, 4) (row, column).

  3. Opening step 1 (the horizontal fold) gives holes at (2, 1), (2, 4), (3, 1), (3, 4) (row, column).

  4. Figure 2 shows these 4 holes.

Worth noting

The folded sheet has 4 layers, so each punch makes 4 holes. A figure with fewer holes has left a fold closed; one with the right number in the wrong places has opened a fold about the wrong line.

A square sheet is folded twice as the figure shows, and two holes are punched through the folded paper. Which figure is the sheet when opened?

A square sheet, thought of as a 4 by 4 grid: the left half is folded over onto the right half, then the top half is folded down onto the bottom half. 2 holes are then punched through the folded sheet, in the squares at (row, column) (3, 3), (4, 4) of the original sheet.
Options for question 29

Show the explanationHide the explanation

AnswerC · Figure 3An unfolded square sheet, marked as a 4 by 4 grid, with 8 holes at (row, column) from the top-left: (1, 1), (1, 4), (2, 2), (2, 3), (3, 2), (3, 3), (4, 1), (4, 4).

  1. Open the folds in reverse order. Opening a fold adds the mirror image of every hole across that fold line, because each hole went through both layers.

  2. Opening step 2 (the horizontal fold) gives holes at (1, 4), (2, 3), (3, 3), (4, 4) (row, column).

  3. Opening step 1 (the vertical fold) gives holes at (1, 1), (1, 4), (2, 2), (2, 3), (3, 2), (3, 3), (4, 1), (4, 4) (row, column).

  4. Figure 3 shows these 8 holes.

Worth noting

The folded sheet has 4 layers, so each punch makes 4 holes. A figure with fewer holes has left a fold closed; one with the right number in the wrong places has opened a fold about the wrong line.

Aarav makes two folds in a square sheet, then punches it in two places. How many holes, and where, will he find when he unfolds it? Choose the figure.

A square sheet, thought of as a 4 by 4 grid: the right half is folded over onto the left half, then the bottom half is folded up onto the top half. 2 holes are then punched through the folded sheet, in the squares at (row, column) (1, 2), (2, 2) of the original sheet.
Options for question 30

Show the explanationHide the explanation

AnswerD · Figure 4An unfolded square sheet, marked as a 4 by 4 grid, with 8 holes at (row, column) from the top-left: (1, 2), (1, 3), (2, 2), (2, 3), (3, 2), (3, 3), (4, 2), (4, 3).

  1. Open the folds in reverse order. Opening a fold adds the mirror image of every hole across that fold line, because each hole went through both layers.

  2. Opening step 2 (the horizontal fold) gives holes at (1, 2), (2, 2), (3, 2), (4, 2) (row, column).

  3. Opening step 1 (the vertical fold) gives holes at (1, 2), (1, 3), (2, 2), (2, 3), (3, 2), (3, 3), (4, 2), (4, 3) (row, column).

  4. Figure 4 shows these 8 holes.

Worth noting

The folded sheet has 4 layers, so each punch makes 4 holes. A figure with fewer holes has left a fold closed; one with the right number in the wrong places has opened a fold about the wrong line.

With the paper folded into four layers, two punches are made, as marked. Pick the figure showing the fully opened paper.

A square sheet, thought of as a 4 by 4 grid: the top half is folded down onto the bottom half, then the left half is folded over onto the right half. 2 holes are then punched through the folded sheet, in the squares at (row, column) (3, 4), (4, 4) of the original sheet.
Options for question 31

Show the explanationHide the explanation

AnswerA · Figure 1An unfolded square sheet, marked as a 4 by 4 grid, with 8 holes at (row, column) from the top-left: (1, 1), (1, 4), (2, 1), (2, 4), (3, 1), (3, 4), (4, 1), (4, 4).

  1. Open the folds in reverse order. Opening a fold adds the mirror image of every hole across that fold line, because each hole went through both layers.

  2. Opening step 2 (the vertical fold) gives holes at (3, 1), (3, 4), (4, 1), (4, 4) (row, column).

  3. Opening step 1 (the horizontal fold) gives holes at (1, 1), (1, 4), (2, 1), (2, 4), (3, 1), (3, 4), (4, 1), (4, 4) (row, column).

  4. Figure 1 shows these 8 holes.

Worth noting

The folded sheet has 4 layers, so each punch makes 4 holes. A figure with fewer holes has left a fold closed; one with the right number in the wrong places has opened a fold about the wrong line.

Lalremsiami folds a square notice twice and punches two holes to pin it up. Which figure shows the holes in the notice when it is flat?

A square sheet, thought of as a 4 by 4 grid: the bottom half is folded up onto the top half, then the right half is folded over onto the left half. 2 holes are then punched through the folded sheet, in the squares at (row, column) (1, 2), (2, 1) of the original sheet.
Options for question 32

Show the explanationHide the explanation

AnswerB · Figure 2An unfolded square sheet, marked as a 4 by 4 grid, with 8 holes at (row, column) from the top-left: (1, 2), (1, 3), (2, 1), (2, 4), (3, 1), (3, 4), (4, 2), (4, 3).

  1. Open the folds in reverse order. Opening a fold adds the mirror image of every hole across that fold line, because each hole went through both layers.

  2. Opening step 2 (the vertical fold) gives holes at (1, 2), (1, 3), (2, 1), (2, 4) (row, column).

  3. Opening step 1 (the horizontal fold) gives holes at (1, 2), (1, 3), (2, 1), (2, 4), (3, 1), (3, 4), (4, 2), (4, 3) (row, column).

  4. Figure 2 shows these 8 holes.

Worth noting

The folded sheet has 4 layers, so each punch makes 4 holes. A figure with fewer holes has left a fold closed; one with the right number in the wrong places has opened a fold about the wrong line.

Figure series

16 questions

Which figure comes next in the series of boxes shown?

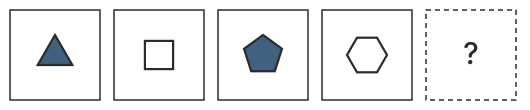
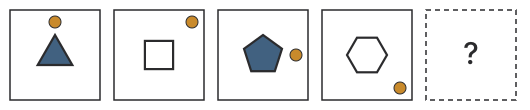
Four boxes in a row, then a fifth box marked with a question mark. Box 1: a shaded triangle. Box 2: an unshaded square. Box 3: a shaded pentagon. Box 4: an unshaded hexagon.
Options for question 33

Show the explanationHide the explanation

AnswerA · Figure 1A box containing a shaded heptagon.

  1. The shape gains one side each time: triangle, square, pentagon, hexagon, so next comes a heptagon.

  2. Shaded and unshaded shapes alternate, starting shaded, so the fifth shape is shaded.

  3. Figure 1 shows a shaded heptagon.

Worth noting

Track one element at a time across all four boxes, and check each option against every rule; each wrong figure here breaks exactly one of them.

Study how the shape changes from box to box, then choose the figure that should replace the question mark.

Four boxes in a row, then a fifth box marked with a question mark. Box 1: a shaded octagon. Box 2: an unshaded heptagon. Box 3: a shaded hexagon. Box 4: an unshaded pentagon.
Options for question 34

Show the explanationHide the explanation

AnswerB · Figure 2A box containing a shaded square.

  1. The shape loses one side each time: octagon, heptagon, hexagon, pentagon, so next comes a square.

  2. Shaded and unshaded shapes alternate, starting shaded, so the fifth shape is shaded.

  3. Figure 2 shows a shaded square.

Worth noting

Track one element at a time across all four boxes, and check each option against every rule; each wrong figure here breaks exactly one of them.

The four boxes follow a pattern. Select the fifth.

Four boxes in a row, then a fifth box marked with a question mark. Box 1: a shaded square. Box 2: an unshaded pentagon. Box 3: a shaded hexagon. Box 4: an unshaded heptagon.
Options for question 35

Show the explanationHide the explanation

AnswerC · Figure 3A box containing a shaded octagon.

  1. The shape gains one side each time: square, pentagon, hexagon, heptagon, so next comes a octagon.

  2. Shaded and unshaded shapes alternate, starting shaded, so the fifth shape is shaded.

  3. Figure 3 shows a shaded octagon.

Worth noting

Track one element at a time across all four boxes, and check each option against every rule; each wrong figure here breaks exactly one of them.

Look at the arrow and the dot in each box. What should the next box contain?

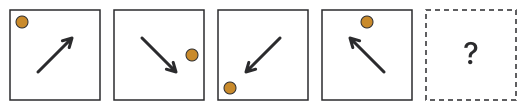
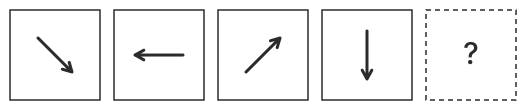
Four boxes in a row, then a fifth box marked with a question mark. Box 1: an arrow pointing up, with a dot at the top-left corner. Box 2: an arrow pointing up-right, with a dot at the top-right corner. Box 3: an arrow pointing right, with a dot at the bottom-right corner. Box 4: an arrow pointing down-right, with a dot at the bottom-left corner.
Options for question 36

Show the explanationHide the explanation

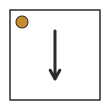
AnswerD · Figure 4A box containing an arrow pointing down, with a dot at the top-left corner.

  1. The arrow turns 45° clockwise each time: up, up-right, right, down-right, so next it points down.

  2. The dot moves 2 places clockwise round the box each time (the 4 corners and 4 edge midpoints are the 8 places): from the bottom-left corner it goes to the top-left corner.

  3. Figure 4 shows an arrow pointing down, with a dot at the top-left corner.

Worth noting

Track one element at a time across all four boxes, and check each option against every rule; each wrong figure here breaks exactly one of them.

Find the figure that continues this sequence of arrows and dots.

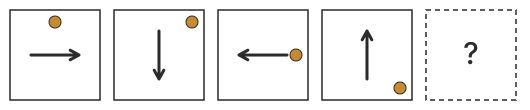
Four boxes in a row, then a fifth box marked with a question mark. Box 1: an arrow pointing right, with a dot at the middle of the top edge. Box 2: an arrow pointing down, with a dot at the top-right corner. Box 3: an arrow pointing left, with a dot at the middle of the right edge. Box 4: an arrow pointing up, with a dot at the bottom-right corner.
Options for question 37

Show the explanationHide the explanation

AnswerB · Figure 2A box containing an arrow pointing right, with a dot at the middle of the bottom edge.

  1. The arrow turns 90° clockwise each time: right, down, left, up, so next it points right.

  2. The dot moves 1 place clockwise round the box each time (the 4 corners and 4 edge midpoints are the 8 places): from the bottom-right corner it goes to the middle of the bottom edge.

  3. Figure 2 shows an arrow pointing right, with a dot at the middle of the bottom edge.

Worth noting

Track one element at a time across all four boxes, and check each option against every rule; each wrong figure here breaks exactly one of them.

An arrow turns and a dot moves round the box. Which figure is the fifth in the pattern?

Four boxes in a row, then a fifth box marked with a question mark. Box 1: an arrow pointing left, with a dot at the top-right corner. Box 2: an arrow pointing down-left, with a dot at the bottom-right corner. Box 3: an arrow pointing down, with a dot at the bottom-left corner. Box 4: an arrow pointing down-right, with a dot at the top-left corner.
Options for question 38

Show the explanationHide the explanation

AnswerA · Figure 1A box containing an arrow pointing right, with a dot at the top-right corner.

  1. The arrow turns 45° anticlockwise each time: left, down-left, down, down-right, so next it points right.

  2. The dot moves 2 places clockwise round the box each time (the 4 corners and 4 edge midpoints are the 8 places): from the top-left corner it goes to the top-right corner.

  3. Figure 1 shows an arrow pointing right, with a dot at the top-right corner.

Worth noting

Track one element at a time across all four boxes, and check each option against every rule; each wrong figure here breaks exactly one of them.

Both the arrow and the dot follow their own rule. Pick the box that comes after the fourth.

Four boxes in a row, then a fifth box marked with a question mark. Box 1: an arrow pointing down, with a dot at the middle of the left edge. Box 2: an arrow pointing up-left, with a dot at the bottom-left corner. Box 3: an arrow pointing right, with a dot at the middle of the bottom edge. Box 4: an arrow pointing down-left, with a dot at the bottom-right corner.
Options for question 39

Show the explanationHide the explanation

AnswerD · Figure 4A box containing an arrow pointing up, with a dot at the middle of the right edge.

  1. The arrow turns 135° clockwise each time: down, up-left, right, down-left, so next it points up.

  2. The dot moves 1 place anticlockwise round the box each time (the 4 corners and 4 edge midpoints are the 8 places): from the bottom-right corner it goes to the middle of the right edge.

  3. Figure 4 shows an arrow pointing up, with a dot at the middle of the right edge.

Worth noting

Track one element at a time across all four boxes, and check each option against every rule; each wrong figure here breaks exactly one of them.

Continue the pattern: which option belongs in the empty fifth box?

Four boxes in a row, then a fifth box marked with a question mark. Box 1: an arrow pointing up-right, with a dot at the top-left corner. Box 2: an arrow pointing down-right, with a dot at the middle of the right edge. Box 3: an arrow pointing down-left, with a dot at the bottom-left corner. Box 4: an arrow pointing up-left, with a dot at the middle of the top edge.
Options for question 40

Show the explanationHide the explanation

AnswerC · Figure 3A box containing an arrow pointing up-right, with a dot at the bottom-right corner.

  1. The arrow turns 90° clockwise each time: up-right, down-right, down-left, up-left, so next it points up-right.

  2. The dot moves 3 places clockwise round the box each time (the 4 corners and 4 edge midpoints are the 8 places): from the middle of the top edge it goes to the bottom-right corner.

  3. Figure 3 shows an arrow pointing up-right, with a dot at the bottom-right corner.

Worth noting

Track one element at a time across all four boxes, and check each option against every rule; each wrong figure here breaks exactly one of them.

Track the arrow's direction and the dot's position across the boxes. Which figure should come next?

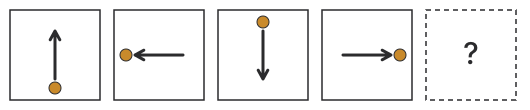
Four boxes in a row, then a fifth box marked with a question mark. Box 1: an arrow pointing up, with a dot at the middle of the bottom edge. Box 2: an arrow pointing left, with a dot at the middle of the left edge. Box 3: an arrow pointing down, with a dot at the middle of the top edge. Box 4: an arrow pointing right, with a dot at the middle of the right edge.
Options for question 41

Show the explanationHide the explanation

AnswerD · Figure 4A box containing an arrow pointing up, with a dot at the middle of the bottom edge.

  1. The arrow turns 90° anticlockwise each time: up, left, down, right, so next it points up.

  2. The dot moves 2 places clockwise round the box each time (the 4 corners and 4 edge midpoints are the 8 places): from the middle of the right edge it goes to the middle of the bottom edge.

  3. Figure 4 shows an arrow pointing up, with a dot at the middle of the bottom edge.

Worth noting

Track one element at a time across all four boxes, and check each option against every rule; each wrong figure here breaks exactly one of them.

Only an arrow changes in these boxes. Which figure follows?

Four boxes in a row, then a fifth box marked with a question mark. Box 1: an arrow pointing down-right. Box 2: an arrow pointing left. Box 3: an arrow pointing up-right. Box 4: an arrow pointing down.
Options for question 42

Show the explanationHide the explanation

AnswerC · Figure 3A box containing an arrow pointing up-left.

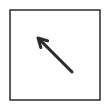
  1. The arrow turns 135° clockwise each time: down-right, left, up-right, down, so next it points up-left.

  2. Figure 3 shows an arrow pointing up-left.

Worth noting

Track one element at a time across all four boxes, and check each option against every rule; each wrong figure here breaks exactly one of them.

The arrow turns by the same angle every time. Which way does it point in the fifth box?

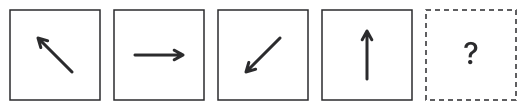
Four boxes in a row, then a fifth box marked with a question mark. Box 1: an arrow pointing up-left. Box 2: an arrow pointing right. Box 3: an arrow pointing down-left. Box 4: an arrow pointing up.
Options for question 43

Show the explanationHide the explanation

AnswerA · Figure 1A box containing an arrow pointing down-right.

  1. The arrow turns 135° clockwise each time: up-left, right, down-left, up, so next it points down-right.

  2. Figure 1 shows an arrow pointing down-right.

Worth noting

Track one element at a time across all four boxes, and check each option against every rule; each wrong figure here breaks exactly one of them.

Work out how far the arrow turns between boxes and choose the next figure.

Four boxes in a row, then a fifth box marked with a question mark. Box 1: an arrow pointing down-left. Box 2: an arrow pointing right. Box 3: an arrow pointing up-left. Box 4: an arrow pointing down.
Options for question 44

Show the explanationHide the explanation

AnswerB · Figure 2A box containing an arrow pointing up-right.

  1. The arrow turns 135° anticlockwise each time: down-left, right, up-left, down, so next it points up-right.

  2. Figure 2 shows an arrow pointing up-right.

Worth noting

Track one element at a time across all four boxes, and check each option against every rule; each wrong figure here breaks exactly one of them.

A shape, its shading and a dot all change along this series. Which figure comes fifth?

Four boxes in a row, then a fifth box marked with a question mark. Box 1: a shaded triangle, with a dot at the middle of the top edge. Box 2: an unshaded square, with a dot at the top-right corner. Box 3: a shaded pentagon, with a dot at the middle of the right edge. Box 4: an unshaded hexagon, with a dot at the bottom-right corner.
Options for question 45

Show the explanationHide the explanation

AnswerC · Figure 3A box containing a shaded heptagon, with a dot at the middle of the bottom edge.

  1. The shape gains one side each time: triangle, square, pentagon, hexagon, so next comes a heptagon.

  2. Shaded and unshaded shapes alternate, starting shaded, so the fifth shape is shaded.

  3. The dot moves 1 place clockwise round the box each time (the 4 corners and 4 edge midpoints are the 8 places): from the bottom-right corner it goes to the middle of the bottom edge.

  4. Figure 3 shows a shaded heptagon, with a dot at the middle of the bottom edge.

Worth noting

Track one element at a time across all four boxes, and check each option against every rule; each wrong figure here breaks exactly one of them.

Three things change from box to box here. Which option obeys all three rules for the next box?

Four boxes in a row, then a fifth box marked with a question mark. Box 1: a shaded heptagon, with a dot at the top-left corner. Box 2: an unshaded hexagon, with a dot at the top-right corner. Box 3: a shaded pentagon, with a dot at the bottom-right corner. Box 4: an unshaded square, with a dot at the bottom-left corner.
Options for question 46

Show the explanationHide the explanation

AnswerD · Figure 4A box containing a shaded triangle, with a dot at the top-left corner.

  1. The shape loses one side each time: heptagon, hexagon, pentagon, square, so next comes a triangle.

  2. Shaded and unshaded shapes alternate, starting shaded, so the fifth shape is shaded.

  3. The dot moves 2 places clockwise round the box each time (the 4 corners and 4 edge midpoints are the 8 places): from the bottom-left corner it goes to the top-left corner.

  4. Figure 4 shows a shaded triangle, with a dot at the top-left corner.

Worth noting

Track one element at a time across all four boxes, and check each option against every rule; each wrong figure here breaks exactly one of them.

Watch the number of sides, the shading and the dot. What does the missing box look like?

Four boxes in a row, then a fifth box marked with a question mark. Box 1: a shaded square, with a dot at the bottom-left corner. Box 2: an unshaded pentagon, with a dot at the middle of the bottom edge. Box 3: a shaded hexagon, with a dot at the bottom-right corner. Box 4: an unshaded heptagon, with a dot at the middle of the right edge.
Options for question 47

Show the explanationHide the explanation

AnswerA · Figure 1A box containing a shaded octagon, with a dot at the top-right corner.

  1. The shape gains one side each time: square, pentagon, hexagon, heptagon, so next comes a octagon.

  2. Shaded and unshaded shapes alternate, starting shaded, so the fifth shape is shaded.

  3. The dot moves 1 place anticlockwise round the box each time (the 4 corners and 4 edge midpoints are the 8 places): from the middle of the right edge it goes to the top-right corner.

  4. Figure 1 shows a shaded octagon, with a dot at the top-right corner.

Worth noting

Track one element at a time across all four boxes, and check each option against every rule; each wrong figure here breaks exactly one of them.

Each box differs from the one before in its shape, its shading and its dot. Choose the box that completes the series.

Four boxes in a row, then a fifth box marked with a question mark. Box 1: a shaded octagon, with a dot at the middle of the right edge. Box 2: an unshaded heptagon, with a dot at the bottom-left corner. Box 3: a shaded hexagon, with a dot at the middle of the top edge. Box 4: an unshaded pentagon, with a dot at the bottom-right corner.
Options for question 48

Show the explanationHide the explanation

AnswerB · Figure 2A box containing a shaded square, with a dot at the middle of the left edge.

  1. The shape loses one side each time: octagon, heptagon, hexagon, pentagon, so next comes a square.

  2. Shaded and unshaded shapes alternate, starting shaded, so the fifth shape is shaded.

  3. The dot moves 3 places clockwise round the box each time (the 4 corners and 4 edge midpoints are the 8 places): from the bottom-right corner it goes to the middle of the left edge.

  4. Figure 2 shows a shaded square, with a dot at the middle of the left edge.

Worth noting

Track one element at a time across all four boxes, and check each option against every rule; each wrong figure here breaks exactly one of them.

Counting figures

17 questions

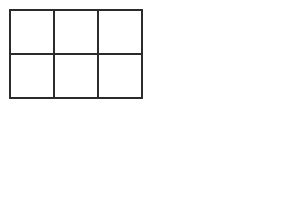
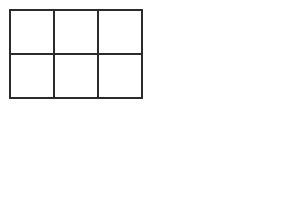
How many squares of all sizes are there in the figure, a rectangle split into 2 rows of 3 equal squares?

The figure is a rectangle divided into a grid of 2 rows and 3 columns of equal squares.
Options for question 49

Show the explanationHide the explanation

AnswerA · 8

  1. 1×11 \times 1 squares: 3×2=63 \times 2 = 6.

  2. 2×22 \times 2 squares: 2×1=22 \times 1 = 2.

  3. Total =6+2=8= 6 + 2 = 8.

Worth noting

6 counts only the smallest squares. Count every size: a 3×23 \times 2 grid holds squares from 1×11 \times 1 up to 2×22 \times 2.

The figure is a 3×33 \times 3 grid, like a noughts-and-crosses board with its outer border drawn. How many squares does it contain in all?

The figure is a rectangle divided into a grid of 3 rows and 3 columns of equal squares.
Options for question 50

Show the explanationHide the explanation

AnswerB · 14

  1. 1×11 \times 1 squares: 3×3=93 \times 3 = 9.

  2. 2×22 \times 2 squares: 2×2=42 \times 2 = 4.

  3. 3×33 \times 3 squares: 1×1=11 \times 1 = 1.

  4. Total =9+4+1=14= 9 + 4 + 1 = 14.

Worth noting

9 counts only the smallest squares. Count every size: a 3×33 \times 3 grid holds squares from 1×11 \times 1 up to 3×33 \times 3.

Two straight lines run from the top corner of a triangle down to its base. How many triangles does the figure contain?

The figure is a triangle divided by 2 lines drawn from its top vertex to its base.
Options for question 51

Show the explanationHide the explanation

AnswerC · 6

  1. From the top vertex there are 4 lines in all: the two sides and the 2 inner lines. Any 2 of them form a triangle with a horizontal line as the third side.

  2. Pairs of lines from the vertex: (42)=6\binom{4}{2} = 6.

  3. Horizontal lines that can close them: 1 (the base).

  4. Triangles =6×1=6= 6 \times 1 = 6.

Worth noting

Counting only the smallest pieces gives 3. Every triangle here has its top at the vertex, so choose its two slanting sides and its base.

Three lines are drawn from the apex of a triangle to points on its base. Count all the triangles in the figure.

The figure is a triangle divided by 3 lines drawn from its top vertex to its base.
Options for question 52

Show the explanationHide the explanation

AnswerD · 10

  1. From the top vertex there are 5 lines in all: the two sides and the 3 inner lines. Any 2 of them form a triangle with a horizontal line as the third side.

  2. Pairs of lines from the vertex: (52)=10\binom{5}{2} = 10.

  3. Horizontal lines that can close them: 1 (the base).

  4. Triangles =10×1=10= 10 \times 1 = 10.

Worth noting

Counting only the smallest pieces gives 4. Every triangle here has its top at the vertex, so choose its two slanting sides and its base.

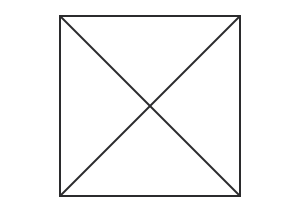
The figure is a square with both its diagonals drawn. How many triangles can be counted in it?

The figure is a square with both its diagonals drawn.
Options for question 53

Show the explanationHide the explanation

AnswerC · 8

  1. Count by size, starting with the smallest pieces.

  2. Smallest triangles: 4. Triangles made of 2 smallest pieces: 4.

  3. Total =4+4=8= 4 + 4 = 8.

Worth noting

Counting only the smallest pieces is the usual slip. Go size by size, and for each size check every position in the figure.

Count the triangles in the figure, a rectangle in which both diagonals have been drawn.

The figure is a rectangle with both its diagonals drawn.
Options for question 54

Show the explanationHide the explanation

AnswerD · 8

  1. Count by size, starting with the smallest pieces.

  2. Smallest triangles: 4. Triangles made of 2 smallest pieces: 4.

  3. Total =4+4=8= 4 + 4 = 8.

Worth noting

Counting only the smallest pieces is the usual slip. Go size by size, and for each size check every position in the figure.

Count every square, small and large, in a grid of 3 rows and 4 columns of equal squares.

The figure is a rectangle divided into a grid of 3 rows and 4 columns of equal squares.
Options for question 55

Show the explanationHide the explanation

AnswerC · 20

  1. 1×11 \times 1 squares: 4×3=124 \times 3 = 12.

  2. 2×22 \times 2 squares: 3×2=63 \times 2 = 6.

  3. 3×33 \times 3 squares: 2×1=22 \times 1 = 2.

  4. Total =12+6+2=20= 12 + 6 + 2 = 20.

Worth noting

12 counts only the smallest squares. Count every size: a 4×34 \times 3 grid holds squares from 1×11 \times 1 up to 3×33 \times 3.

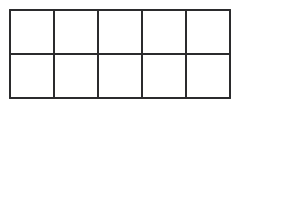
A strip of 2 rows and 5 columns of equal squares is drawn. What is the total number of squares in it?

The figure is a rectangle divided into a grid of 2 rows and 5 columns of equal squares.
Options for question 56

Show the explanationHide the explanation

AnswerD · 14

  1. 1×11 \times 1 squares: 5×2=105 \times 2 = 10.

  2. 2×22 \times 2 squares: 4×1=44 \times 1 = 4.

  3. Total =10+4=14= 10 + 4 = 14.

Worth noting

10 counts only the smallest squares. Count every size: a 5×25 \times 2 grid holds squares from 1×11 \times 1 up to 2×22 \times 2.

How many rectangles, squares included, can be traced along the lines of a grid of 2 rows and 3 columns?

The figure is a rectangle divided into a grid of 2 rows and 3 columns of equal squares.
Options for question 57

Show the explanationHide the explanation

AnswerB · 18

  1. A rectangle is fixed by choosing 2 of the 4 vertical lines and 2 of the 3 horizontal lines.

  2. Vertical pairs: (42)=6\binom{4}{2} = 6. Horizontal pairs: (32)=3\binom{3}{2} = 3.

  3. Rectangles =6×3=18= 6 \times 3 = 18.

Worth noting

Counting only the small squares, or only the squares, misses the long thin rectangles. The line-pair method counts every rectangle exactly once.

A chocolate bar is marked into 2 rows of 4 equal pieces. How many rectangles of any size, squares counted, do its lines form?

The figure is a rectangle divided into a grid of 2 rows and 4 columns of equal squares.
Options for question 58

Show the explanationHide the explanation

AnswerA · 30

  1. A rectangle is fixed by choosing 2 of the 5 vertical lines and 2 of the 3 horizontal lines.

  2. Vertical pairs: (52)=10\binom{5}{2} = 10. Horizontal pairs: (32)=3\binom{3}{2} = 3.

  3. Rectangles =10×3=30= 10 \times 3 = 30.

Worth noting

Counting only the small squares, or only the squares, misses the long thin rectangles. The line-pair method counts every rectangle exactly once.

A triangle has two lines from its top vertex to the base and one line across it, parallel to the base. How many triangles are there?

The figure is a triangle divided by 2 lines drawn from its top vertex to its base and 1 line parallel to its base.
Options for question 59

Show the explanationHide the explanation

AnswerC · 12

  1. From the top vertex there are 4 lines in all: the two sides and the 2 inner lines. Any 2 of them form a triangle with a horizontal line as the third side.

  2. Pairs of lines from the vertex: (42)=6\binom{4}{2} = 6.

  3. Horizontal lines that can close them: 2 (the base and 1 parallel line).

  4. Triangles =6×2=12= 6 \times 2 = 12.

Worth noting

Counting only the smallest pieces gives 6. Every triangle here has its top at the vertex, so choose its two slanting sides and its base.

A triangle is split by one line from its apex to the base, and crossed by two lines parallel to the base. How many triangles can you count?

The figure is a triangle divided by 1 line drawn from its top vertex to its base and 2 lines parallel to its base.
Options for question 60

Show the explanationHide the explanation

AnswerA · 9

  1. From the top vertex there are 3 lines in all: the two sides and the 1 inner line. Any 2 of them form a triangle with a horizontal line as the third side.

  2. Pairs of lines from the vertex: (32)=3\binom{3}{2} = 3.

  3. Horizontal lines that can close them: 3 (the base and 2 parallel lines).

  4. Triangles =3×3=9= 3 \times 3 = 9.

Worth noting

Counting only the smallest pieces gives 6. Every triangle here has its top at the vertex, so choose its two slanting sides and its base.

Counting squares as rectangles, find the total number of rectangles in a 3×33 \times 3 grid of equal squares.

The figure is a rectangle divided into a grid of 3 rows and 3 columns of equal squares.
Options for question 61

Show the explanationHide the explanation

AnswerD · 36

  1. A rectangle is fixed by choosing 2 of the 4 vertical lines and 2 of the 4 horizontal lines.

  2. Vertical pairs: (42)=6\binom{4}{2} = 6. Horizontal pairs: (42)=6\binom{4}{2} = 6.

  3. Rectangles =6×6=36= 6 \times 6 = 36.

Worth noting

Counting only the small squares, or only the squares, misses the long thin rectangles. The line-pair method counts every rectangle exactly once.

In the figure, three lines fan out from the top of a triangle, and a single line cuts across parallel to the base. Find the number of triangles.

The figure is a triangle divided by 3 lines drawn from its top vertex to its base and 1 line parallel to its base.
Options for question 62

Show the explanationHide the explanation

AnswerA · 20

  1. From the top vertex there are 5 lines in all: the two sides and the 3 inner lines. Any 2 of them form a triangle with a horizontal line as the third side.

  2. Pairs of lines from the vertex: (52)=10\binom{5}{2} = 10.

  3. Horizontal lines that can close them: 2 (the base and 1 parallel line).

  4. Triangles =10×2=20= 10 \times 2 = 20.

Worth noting

Counting only the smallest pieces gives 8. Every triangle here has its top at the vertex, so choose its two slanting sides and its base.

Four lines join the apex of a large triangle to its base, and two more lines cross it parallel to the base. What is the total count of triangles?

The figure is a triangle divided by 4 lines drawn from its top vertex to its base and 2 lines parallel to its base.
Options for question 63

Show the explanationHide the explanation

AnswerB · 45

  1. From the top vertex there are 6 lines in all: the two sides and the 4 inner lines. Any 2 of them form a triangle with a horizontal line as the third side.

  2. Pairs of lines from the vertex: (62)=15\binom{6}{2} = 15.

  3. Horizontal lines that can close them: 3 (the base and 2 parallel lines).

  4. Triangles =15×3=45= 15 \times 3 = 45.

Worth noting

Counting only the smallest pieces gives 15. Every triangle here has its top at the vertex, so choose its two slanting sides and its base.

How many triangles are there in the figure, which is a square with both diagonals and the two lines joining the midpoints of its opposite sides?

The figure is a square with both diagonals and both lines joining the midpoints of opposite sides.
Options for question 64

Show the explanationHide the explanation

AnswerA · 16

  1. Count by size, starting with the smallest pieces.

  2. Smallest triangles: 8. Triangles made of 2 smallest pieces: 4. Triangles made of 4 smallest pieces: 4.

  3. Total =8+4+4=16= 8 + 4 + 4 = 16.

Worth noting

Counting only the smallest pieces is the usual slip. Go size by size, and for each size check every position in the figure.

The figure is a triangle with all three of its medians drawn. How many triangles are there in it?

The figure is a triangle with its three medians, each joining a vertex to the midpoint of the opposite side.
Options for question 65

Show the explanationHide the explanation

AnswerB · 16

  1. Count by size, starting with the smallest pieces.

  2. Smallest triangles: 6. Triangles made of 2 smallest pieces: 3. Triangles made of 3 smallest pieces: 6. Triangles made of 6 smallest pieces: 1.

  3. Total =6+3+6+1=16= 6 + 3 + 6 + 1 = 16.

Worth noting

Counting only the smallest pieces is the usual slip. Go size by size, and for each size check every position in the figure.

The area names are NTA's. The chapters inside them are EduFarming's own division, not NTA's.